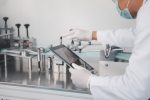
Cleaning medical instruments is a lot more intricate than it might sound.
This is because of the need to thoroughly clean and properly sterilize everything to prevent the spread of infections.
Bacteria, viruses, and other organic materials can spread across the surface and into the nooks and crannies of devices.
Protecting patients and healthcare workers from pathogens has never been more critical.
Also, “clean” isn’t always something you can see with the plain eye.
Plus, keeping instruments clean and properly assembled after sterilization will help them last longer.
Let’s look at a step-by-step guide on how to disassemble tools for cleaning and sterilization in 9 steps.
1. Read the Instructions
Always start by reading the device-specific guidelines to avoid damaging the equipment, missing crucial parts, or failing to clean properly.
These guides will also include information about how to properly disassemble and reassemble.
Keep the instructions in a place where you can read them clearly without having to touch or move the instructions around.
2. Prep Your Cleaning Space
The first step in preparing a cleaning space is to prepare yourself with the proper personal protection equipment (PPE), like gloves, a hat, and sterilized scrubs.
Setting up a clean, sterilized, organized workspace helps keep everything in order and reduces the risk of contamination.
You want to avoid clutter so you don’t lose any small parts or damage anything.
Having your cleaning tools and solutions nearby keeps the process smooth without unnecessary interruptions.
Plus, working in a sterile area ensures no outside particles sneak in and mess with the cleaning.
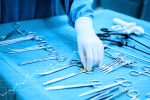
3. Carefully Disassemble the Piece of Equipment
Disassemble tools as quickly as it is safe to do so after a procedure, but do not rush the process.
Follow the manufacturer’s instructions step by step, paying close attention to how each part comes apart.
If a tool is particularly complicated, you can take photos (if allowed) to remember how the parts were organized or removed.
Be careful to avoid forcing a tool that seems stuck or unmovable.
This prevents damage to delicate components and ensures you don’t miss any hidden parts that may trap contaminants.
Keep parts organized as you disassemble them to avoid confusion when reassembling them later.
4. Inspect the Device or Tool
Since part of the job of disassembling medical equipment for cleaning is also to extend the lifespan of the tools, you should review every element for wear and tear or damage.
Look for cracks, corrosion, debris, or any irregularities that could affect the instrument’s function.
Damaged parts should be flagged for repair or replacement before the instrument is used again after they are cleaned and sterilized.
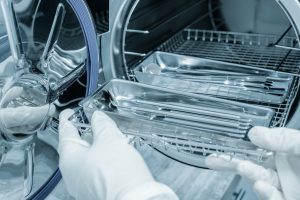
5. Clean & Sterilize the Tool
Using the manufacturer’s instructions, workplace requirements, and code compliance from the CDC or other health entities, clean and sterilize each piece of equipment.
Pay special attention to avoid cross-contamination between instruments or tools.
Add extra effort to those cracks and moving parts where cleaning might require more detail.
Use sterile water or approved cleaning solutions to rinse each component thoroughly.
You need to make sure that all cleaning products are removed.
6. Dry the Tools
Once all the cleaning products are removed and sterile water has been used to rinse, you want to follow the guidelines to dry the tools before you reassemble any parts.
Drying each component could include using clean, lint-free cloths or air-drying methods.
Allowing the tool to dry will prevent corrosion or the spread of bacteria or mold.
7. Reassemble Parts
Once all parts are cleaned, inspected, and dried, carefully reassemble the instrument.
Use the photos, notes, or the manufacturer’s instructions as a guide to ensure that each component is put back in the proper order.
Double-check that all screws, clips, or other fasteners are securely in place and that there are no missing or loose parts.
Even if a tool is properly cleaned, misalignment or improperly assembled parts could affect the instrument’s performance during future medical procedures.
8. Test Equipment
Once reassembled, you want to put the equipment through a basic test of function without exposing it to potential bacteria or viruses.
Depending on the device, this may involve checking its movement, hinges, or electrical connections.
A thorough test helps to confirm that the instrument is ready for use again and that no errors were made during disassembly or reassembly.
For complex medical devices, functional testing may require additional specialized equipment or professional inspection.
Again, all steps should be taken in compliance with the manufacturer’s instructions and healthcare facility policies.
9. Properly Store Equipment
Once the equipment is cleaned and sterilized, it’s important to follow the proper steps to store the items until they are used again.
Tools are often sealed in sterile packaging, such as pouches or wraps, that can be opened just before use.
Instruments may await use in cabinets or designated sterile storage areas, which are temperature-controlled and moisture-free to prevent damage or bacterial growth.
Some facilities use special sterilization trays or cassettes to organize and protect instruments.
A Quick Step-by-Step List
- Read the Instructions
- Prep Your Cleaning Space
- Carefully Disassemble the Piece of Equipment
- Inspect the Device or Tool
- Clean & Sterilize the Tool
- Dry the Tools
- Reassemble Parts
- Test Equipment
- Properly Store Equipment
Frequently Asked Questions
What is the most common way to clean medical instruments?
The most common way to clean medical instruments is through a process called sterilization, typically involving a combination of manual cleaning, disinfection, and autoclaving.
First, instruments are manually scrubbed or soaked in an enzymatic solution to remove debris like blood and tissue.
After this, they are rinsed and placed in an autoclave, which uses high-pressure steam at high temperatures to kill bacteria, viruses, and other microorganisms.
Autoclaving is the gold standard because it effectively sterilizes a wide variety of instruments and is used in hospitals, clinics, and labs worldwide to ensure equipment is safe for reuse.
What is the most used medical instrument?
The most commonly used medical instrument is the stethoscope.
It’s a fundamental tool for doctors, nurses, and other healthcare providers, allowing them to listen to internal sounds of the body, particularly the heart and lungs.
Stethoscopes have been used for more than two centuries as a versatile and efficient tool in medical examinations.
Despite advances in medical technology, the stethoscope remains a key diagnostic tool in everyday practice.
These popular tools are cleaned by using isopropyl alcohol between patients and then thoroughly cleaned at the end of the day.
What would the repercussions be if the instruments were used prior to being sterilized?
Using medical instruments without sterilization can lead to severe health risks, including the transmission of bacteria, viruses, or fungi.
Patients risk developing healthcare-associated infections (HAIs), which can cause complications, prolonged recovery times, or even death.
Contaminated instruments can spread diseases such as MRSA or hepatitis.
Healthcare providers might face legal consequences, loss of trust, and damage to their reputation due to malpractice.
In the long term, this could also contribute to increased antibiotic resistance, leading to more difficult-to-treat infections and overwhelming healthcare systems.
This page is also available in Spanish.